Do you want to know how to perform QuickBooks Diagnostic Tool install? Then, this complete guide on QB Diagnostic Tool will help you. QuickBooks Diagnostic Tool is like a superhero that helps you fix QuickBooks installation errors. But why do these QuickBooks installations issues occur?
Actually, your QuickBooks application needs a lot of Microsoft core components for the proper functioning of your QuickBooks software. And QB Install Diagnostic Tool assists you to resolve QuickBooks issues related to those missing components. Let us now tell you more things about this tool.
Table of Contents
What is QuickBooks Diagnostic Tool?
Specifically developed by Intuit, the QB Diagnostic Tool is a premium tool that recognizes and resolves QuickBooks errors through a scan process. It’s undeniably an irritating situation when you face an error while installing QuickBooks accounting software.
In such a situation, all you need is an instant solution to fix installation-related QuickBooks issues. And that’s the time when you have QB Install Diagnostic Tool to rescue. Are you now eager to know why is QB Install Diagnostic Tool helpful for the overall performance of the QuickBooks software you use? Scroll down the curser to find the answer.
Is QuickBooks Install Diagnostic Tool Helpful?
Install Diagnostic Tool for QuickBooks helps you to identify QuickBooks installation errors without wasting much energy, time, and money. Your QuickBooks Desktop comes with a few features that demand some Microsoft Core Components for its proper functioning.
Any of these components can stop working due to miscellaneous reasons. As a result, you face QuickBooks errors. The worst part about these QuickBooks issues is that you can’t resolve them manually. So, a QuickBooks Diagnostic tool detects all the QuickBooks installation issues related to .NET Framework, C++, MSXML, etc.
What QuickBooks Issues QuickBooks Install Diagnostic Tool Resolves?
You can always use the QB Install Diagnostic Tool 2022 to resolve a wide variety of QuickBooks issues. These QuickBooks errors can be:
- QuickBooks update error 15270
- QB Installation Error 1335
- Update error 15223 in QuickBooks
- QuickBooks update error 1328
- QB update error 12007
Besides the above QuickBooks errors, you can use the Install Diagnostic Tool for QuickBooks to solve the problems related to:
- The MSXML component is effortless to rectify using the QuickBooks Install Diagnostic Tool.
- When the QuickBooks application stops working or operating
- The QuickBooks Diagnostic Tool will also resolve frame issues like the.NET frame problem
- The Flawa in C++ programming while running the QuickBooks application
How to Install and Download QuickBooks Install Diagnostic Tool?
Now, when you already know a lot of things about the QuickBooks Install Diagnostic Tool, the most confusing question that pops up inside your mind is, “ How do I install a diagnostic tool in QuickBooks?” Follow this step-by-step guide to download and install it.
Step 1: Download the QuickBooks Install Diagnostic Tool 2022
- Firstly, visit the official site of Intuit and then download the QuickBooks desktop install diagnostic tool.
- It might take some time for the download process to complete and the setup files to save.
- Make sure you save the setup file to a location that is easy to locate.
- We would recommend you save the setup file on the Windows desktop.
Step 2: Install the QuickBooks Diagnostic Tool
- Now to complete the installation process, you have to go to the location where you saved the setup file. Open it by clicking on it.
- Navigate the mouse to the file named QuickBooksDesktopInstallDiagnosticTool.exe and select it. Tap on the Run option.
- Later, a new dialogue box will appear on the screen with the license agreement. Press the Yes button to agree with the agreement.
- After applying the above process, you will successfully install the QB Install Diagnostic Tool.
- Restart your computer system and then open the diagnostic Tool. Check if all the main components are updated to the latest version.
Are there some points to keep in mind while using QuickBooks Install Diagnostic Tool?
After you successfully download and install the QuickBooks Install Diagnostic Tool, you still need to keep some points in mind. These points are essential as they will let you use this tool in an effective way. Enlisted are a few of them:
- It is necessary to shut all other running programs on your computer before running the scan with the QuickBooks Diagnostic tool you downloaded.
- You might need to reboot the system several times after the tool fixes QuickBooks errors.
- When you face a QuickBooks issue and the diagnostic tool in QuickBooks does not detect the problem, it means there is some error in your QuickBooks Install Diagnostic Tool. Consult QuickBooks experts in such a situation.
How Do Various Interfaces of QuickBooks Install Diagnostic Tool Help You Fix QuickBooks Installation Error 1335?
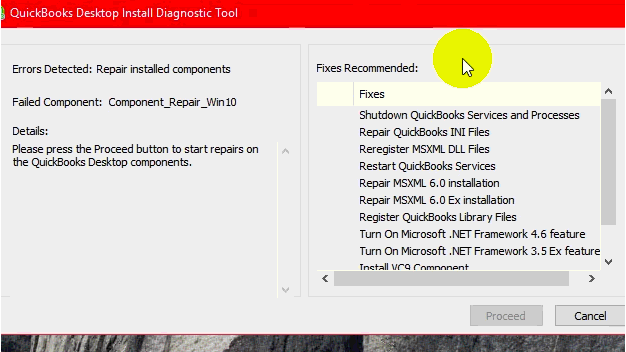
There are three interfaces in the QB install diagnostic tool, including the Connection tab, firewall settings, and network connectivity tab. Here are a few ways that you can apply for fixing QB installation errors like 1335:
1st Method: Open and run the QB install diagnostic tool
2nd Method: Go for the Windows update
3rd Method: Fix the Microsoft .Net Framework and MSXML
4th Method: Troubleshoot the Cabinet File Manually
5th Method: Try installing QuickBooks in the Windows Safe Mode
Also Know: The Perfect Guide To Download QuickBooks Tool Hub (Fix QuickBooks Errors)
Then Check: How To Download QuickBooks File Doctor And Fix QuickBooks Errors? (Easy Way)
How to Use the QuickBooks Install Diagnostic Tool to Resolve the Installation Error in QuickBooks?
QuickBooks Diagnostic Tool is the first thing that comes to anyone’s mind while resolving QuickBooks update issues or Installation errors. You can eliminate all the QuickBooks installation errors smoothly by using the following steps:
- Firstly, you need to locate the QB Diagnostic Tool.
- If you can’t locate the tool on your system, look for the Search field in the Menu Bar after tapping on the Start button.
- After typing QuickBooks in the search field, press the Enter button.
- A new page will appear on the screen in the Menu bar. You have to navigate the Mouse to the Install Diagnostic Tool for QuickBooks and tap on it to open.
- Start scanning the error to identify after opening the tool.
- This process might take some time to scan the error from your system and fix it.
- After the completion of diagnosis, restart your device and ensure that all the vital components for QuickBooks are updated to the latest version.
What Procedures Can You Apply If QuickBooks Install Diagnostic Tool fails to resolve QuickBooks Installation Error?
There are possibilities that you might face issues with Install Diagnostic Tool for QuickBooks. This will happen especially at the time when it fails to resolve the QuickBooks Installation error. Then what to do in this condition?
You can still apply certain procedures if QuickBooks installation errors still exist after applying the scanning process in the Install Diagnostic Tool for QuickBooks. Given below are some of those steps:
Procedure 1: Uninstall and Reinstall the QuickBooks Desktop
The first and foremost procedure that everyone should try before engaging in another convoluted solution is this one. It will solve your error if you don’t wish to try many different methods. The method will definitely work. Since after uninstalling the QB desktop, the error will also be deleted. So the error will not appear once the software is reinstalled.
Procedure 2: Update The Windows Operating System
You can always update the Windows operating system if the first procedure fails. All you need to do is update your Windows operating system to its latest version. Either download the software from the official website or navigate through the control panel for finding the update options, it’s your choice.
Procedure 3: Perform the manual methods for solving the QuickBooks Error
If the QuickBooks Install Tool and the update don’t solve the QB error, you can fix specific Windows components yourself by doing the following things:
- Repair or reinstall Microsoft .NET Framework
- Repair Microsoft MSXML
Please Note: Always ensure to take help from experts before fixing the QuickBooks errors manually.
Procedure 4: Restart your system in the selective startup mode to solve the QuickBooks error
Is the QuickBooks error too stubborn for getting detected by any of the above methods? Yes? Then, you can restart your system in a selective startup mode and then use the below steps:
- After starting your system in selective startup mode, hold the Windows+R keys together to open the run command.
- A box will appear on the screen with a blank space, where the user has to type MSConfig to browse the file and then press OK.
- A system configuration window will pop up on the screen.
- Later, select the General tab and then choose to Hide all Microsoft services.
- Now you will have to tap on the Disable all button,
- You can now uncheck the box available in front of the Hide Microsoft services option.
- Verify the list of services and select the Windows installer box. Make sure to check the box properly and press OK.
- Restart the device to apply the changes.
Frequently Asked Questions (FAQs)
Q1) How do I repair QuickBooks desktop?
Answer: You can repair QuickBooks desktop with the help of the QB Install Diagnostic Tool. It is an easy-to-use tool by Intuit for solving QuickBooks errors without much need for operator interaction. You can resolve QuickBooks 6000 series errors, QuickBooks H series errors like H202, and a lot more similar issues using it.
Q2 How do I repair QuickBooks installation issues?
Answer: You can repair QuickBooks installation issues by applying the following methods:
- Firstly, launch the QuickBooks Tool Hub.
- Now, go to the tools hub and select the installation concerns.
- Then, select QB Install Diagnostic Tool , and allow it to run.
- Reboot the system after completing the operation.
Q3 How do I fix QuickBooks desktop update errors?
Answer: If you encounter a QuickBooks update issue due to installation files, you can fix the error using QuickBooks Diagnostic Tool from QB Tool Hub by applying the below steps:
- Firstly, open the QuickBooks Tool Hub.
- Now, tap on the Installation Issues tab in the QuickBooks Tool Hub.
- Next, select QuickBooks Install Diagnostic tool.
- The tool will run to repair the QuickBooks installation issues.
- Restart your system once the tool resolves the QuickBooks installation errors.
Q4 How do I fix error code 1603 in QuickBooks?
Answer: QuickBooks error code 1603 usually occurs when you attempt to install or update QuickBooks software on your computer. You can fix this QuickBooks error 1603 using QB Install Diagnostic tool. Use the following steps:
- Firstly, download the QBinstallTool.exe file and then run it.
- Save the file to your desktop after downloading it.
- Run the QB Install Diagnostic Tool by opening the file
Q5 How to download and install QuickBooks Desktop?
Answer: QuickBooks Desktop is excellent accounting software for handling day-to-day accounting and bookkeeping tasks. You can download and install this program by following the procedures below:
- To begin, get the proper installation file for the QuickBooks desktop product.
- Go to the Downloads & Updates page.
- Choose the country, product, and version.
- Click the download button to complete the installation.
Wrapping it up:
Undoubtedly, QuickBooks Install Diagnostic Tool can make your work easy when it comes to detecting and resolving QuickBooks errors related to installation and updates. And after reading this complete guide, you finally know how to perform QB Diagnostic Tool install.
Do you want to know more about QuickBooks errors and tools for resolving them? Well, you can always connect with our experts’ team. We are round-the-clock available to help you.
